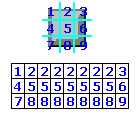
You can create your own button style. Simply create a bitmap with a width equal to a multiple of 3 (ie: 24) and a height also equal to a multiple of 3 (ie: 36). The figure on the right illustrates how button.exe divides the style image and paints the button background. Name the file btnXX.bmp where XX stands for the style number you created and place it in the sub-directory where the style images are stored.
NOTE: The bitmap must be created with a maximum of 256 colors.
Use the INI file settings to make sure that all buttons created are using the same values. It is supported in both mode, CGI or Command Line.
How to change all buttons look:
Create a batch file (see demo.bat) in which you specify the caption and the output file name. Set the default values in the INI file. Once this is done changing one of the values in the INI file and running the batch file instantly changes the look of all buttons.
How to change the style directory:
All style images are stored in a sub-directory, the default is buttons. It is possible to store the images in another location simply enter the path in the INI file:
imagessubdir=path
How to create a button with more than one line:
You can easily create buttons with several lines of text by incorporating a line break in the caption. In CGI mode use %0D and in command line mode use ++0D.
- Cmd Line: button -t:This+text++0Dhas+several++0D+lines
- CGI: button.exe?text=This+text%0Dhas+several%0D+lines
Understanding Dates and Times functions:
button.exe supports special date and time functions by preceeding the text with $$:
$$c or $$t or $$ddd+mmm+d,+yy+'@'+hh:mm+ampm
| c | Displays the date using the short format of the operating system followed by the time using the long format. |
| d | Displays the day as a number without a leading zero (1-31). |
| dd | Displays the day as a number with a leading zero (01-31). |
| ddd | Displays the day as an abbreviation (Sun-Sat). |
| dddd | Displays the day as a full name (Sunday-Saturday). |
| ddddd | Displays the date using the short format. |
| dddddd | Displays the date using the long format. |
| m | Displays the month as a number without leading zero. |
| mm | Displays the month as a number with leading zero. |
| mmm | Displays the month as Jan-Dec. |
| mmmm | Displays the month as January-December. |
| yy | Displays the year as a two-digit number (00-99). |
| yyyy | Displays the year as a four-digit number (0000-9999). |
| h | Displays the hour without leading zero (0-23). |
| hh | Displays the hour with a leading zero (00-23). |
| n | Displays the minute without a leading zero (0-59). |
| nn | Displays the minute with a leading zero (00-59). |
| s | Displays the second without leading zero (0-59). |
| ss | Displays the second with leading zero (00-59). |
| t | Displays the time using the short format. |
| tt | Displays the time using the long format. |
| ampm | Uses the 12-hour clock and displays 'am' or 'pm'. |
| a/p | Uses the 12-hour clock and displays 'a' or 'p'. |
| / | Displays the default date separator character. |
| : | Displays the default time separator character. |
| 'xx' | Characters enclosed in single quotes display as-is. |
EXAMPLES:
| $$c | 04/21/99 12:30:17 pm |
| $$t | 12:30 pm |
| $$ddd+mmm+d,+yy+'@'+hh:mm+ampm | Wed Apr 21, 99 @ 12:30 pm |
| $$dddd+mmmm+d+yyyy | Wednesday April 21 1999 |
Fills are bitmap images used by button.exe as background. The bitmap image can be any size, button.exe will repeat the image as many times as necessary to fill the entire button background. The border tag will determine how thick the edges will be. The fill images must follow the naming convention: fillXX.bmp where XX stands for the fill number that you can reference in Command Line mode, CGI mode or in the INI file.
[View Demos]
[Help]
[Build]
[Tips & Tricks]
[Fill Catalog]
[Download]
[Buy]